If you plan to keep your catch, you’ll want some way to bring it along as you continue fishing – ideally keeping it alive in water so the meat stays fresh. A DIY fish stringer made out of paracord, bank line or some other cordage is cheap and compact, so it’s worth keeping a couple of them with your other fishing gear.
Although basic rope stringers are only $5 or $10 on Amazon, you can make one yourself for free with scrap materials – a strong stick and some durable string. The only other thing you’ll need is need a knife or something to carve down the wood, and half an hour to spare.

The “needle” end of a stringer is narrow enough that it can slip through the bottom lip or the gill plate of a fish. You guide the needle through its lip or gills, pull the string through, then wrap the needle around a ring or loop on the opposite end of the cordage to secure the fish. Now you’re ready to carry your catch from fishing hole to fishing hole.
Stringing through the lip is strongly preferred because it’s easier for the fish to breath, which should keep it alive longer and keep your meat fresher.
These simple rope stringers are still great to have as a lightweight backup if you already own a heavier all-metal stringer like this.
How To Make a DIY Fish Stringer
Here’s what you’ll need for your homemade fish stringer…
…1) A straight stick from a hard wood like oak or maple, around half an inch thick (which will be carved down much thinner). You can also use a thin metal object or any other material that seems suitable but attaching the string might be harder if you use the same method we’ll be showing with the wood.
The needle should be thin enough that it’s easy to feed through the lip of a fish, but not so thin that it weakens the wood. Freshly harvested green wood will carve easier but will also have more flex.
…2) You’ll also need an ideal type of cordage cut between five and eight feet long. The completed stringer will be much shorter (by about two feet in our demo). Bank line (tarred twine), paracord and PE line are great choices.
You’ll want cordage that is thin, but again, not so thin as to be weak. Heavier cordage will be harder to slip through the lip of a small trout, and we’ll be adding the thickness of the cordage to the needle by wrapping it in place.
Size #36 bank line (0.085-inch diameter) works well, though we will often untwist this cordage for a single strand that results in a thinner profile after winding up on the needled.
Step 1: Carve your wood down.
The finished needle should measure somewhere around a quarter of an inch (6-7mm) or less at its widest point, and three or four inches (7-10cm) long.
The bottom of the needle should be narrow to a point and then it should get gradually thicker as you reach the top. This flare gives the cordage resistance to stay locked in place once it’s bound up on the needle.

Carve with your knife angled flatter at the beginning to take bigger strips of wood and then stand the blade up straight toward the end to take shavings. This will smooth your needle out. You want the wood to be as smooth as possible so it slides through the fish’s mouth or gills easily.
If you’re looking to use a metal needle, you can hammer the top so it becomes flared and/or scuff up the finish where you’ll be wrapping cordage so it has something to bite against.
Step 2: Start wrapping your cordage.
Drape one side of your cordage over the thick side of your needle so there’s a loose end hanging around halfway down the wood. On the other side of the cordage, start wrapping the slack around the needle, beginning closest to the tag end that is draping down. Like this:


Make clean wraps so the cordage doesn’t overlap as you go around. Doubling over the wraps will only make the needle thicker.
When you reach the top of your wraps, there should be a small loop left hanging out from when you started with the cordage draped over top of the needle.

Feed the remaining slack end through this loop so your wraps can’t unravel and cinch everything down.
Step 3: Tie a small loop on the end.
You’ll also need some kind of loop on the opposite end of the cordage to feed the needle through so you can secure a fish on the line. Commercial stringers tend to have a small metal split ring and if you have something like a spare key ring available, then you could use the improved clinch knot to attach your cordage to that item.
Tying a loop in the cordage itself works just fine though and doesn’t require any extra materials. You need a loop that’s just large enough to feed the needle through, around one or two inches in diameter is plenty. You don’t want the loop so large that the needle can come back through easily without being guided.

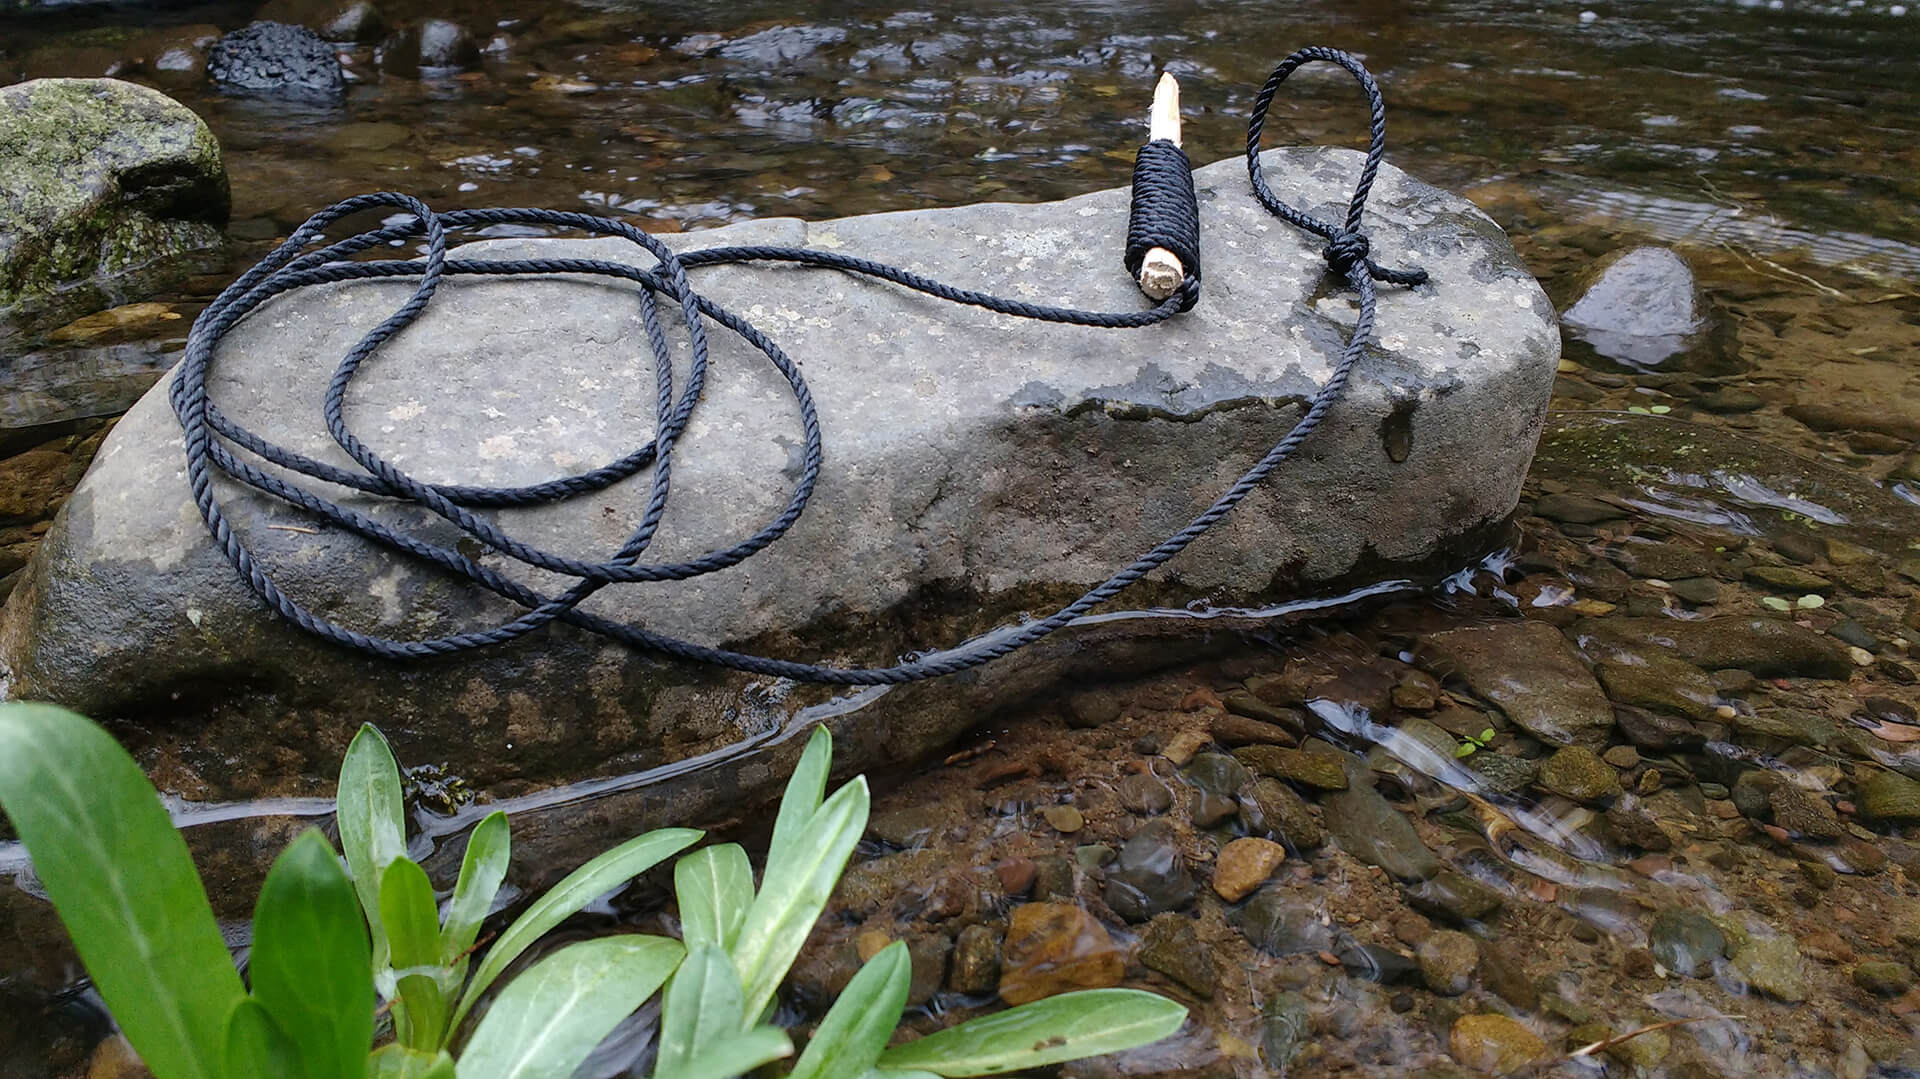
After wrapping your cordage around the needle and tying a loop on the opposite end, the finished stringer should be around four feet long if you started with about six feet of cordage, as in our demonstration. You can go as short or as long as you need but the stringer starts becoming unwieldy if you go much longer than we did here. We’d rather make a second one than add length.
That One’s a Keeper…

You could make the same basic DIY fish stringer many other ways using different materials, but sticks are easy to find and the carved wood easily slides through the lip or gill plate of a fish, especially if you wet the needle and string first. This type of stringer obviously isn’t as durable as one made entirely out of metal, but it should hold up to many years of use – until a fray starts forming in the cordage.
Leave a Reply