Knowing how to tie fishing knots can make or break your experience on the water. For all the knots there are to wrap your head around, few are as valuable to memorize as the improved clinch knot and double uni knot.
Versatility can be hard to come by in a knot. Most of them serve a specific purpose with few use cases outside that special scenario. They also tend to be complicated, involving many wraps and loops to complete.

Remembering how to tie fishing knots can be difficult between their limited applications and how many steps are often involved with tying them.
Whether you’re fishing for the first time or just brushing up on the basics after taking a season off, we’ve got you covered with a quick guide on how to tie two fishing knots everyone should know: one that will let you attach any line to any lure, and another that will attach any two lines together.
Let’s get tying.
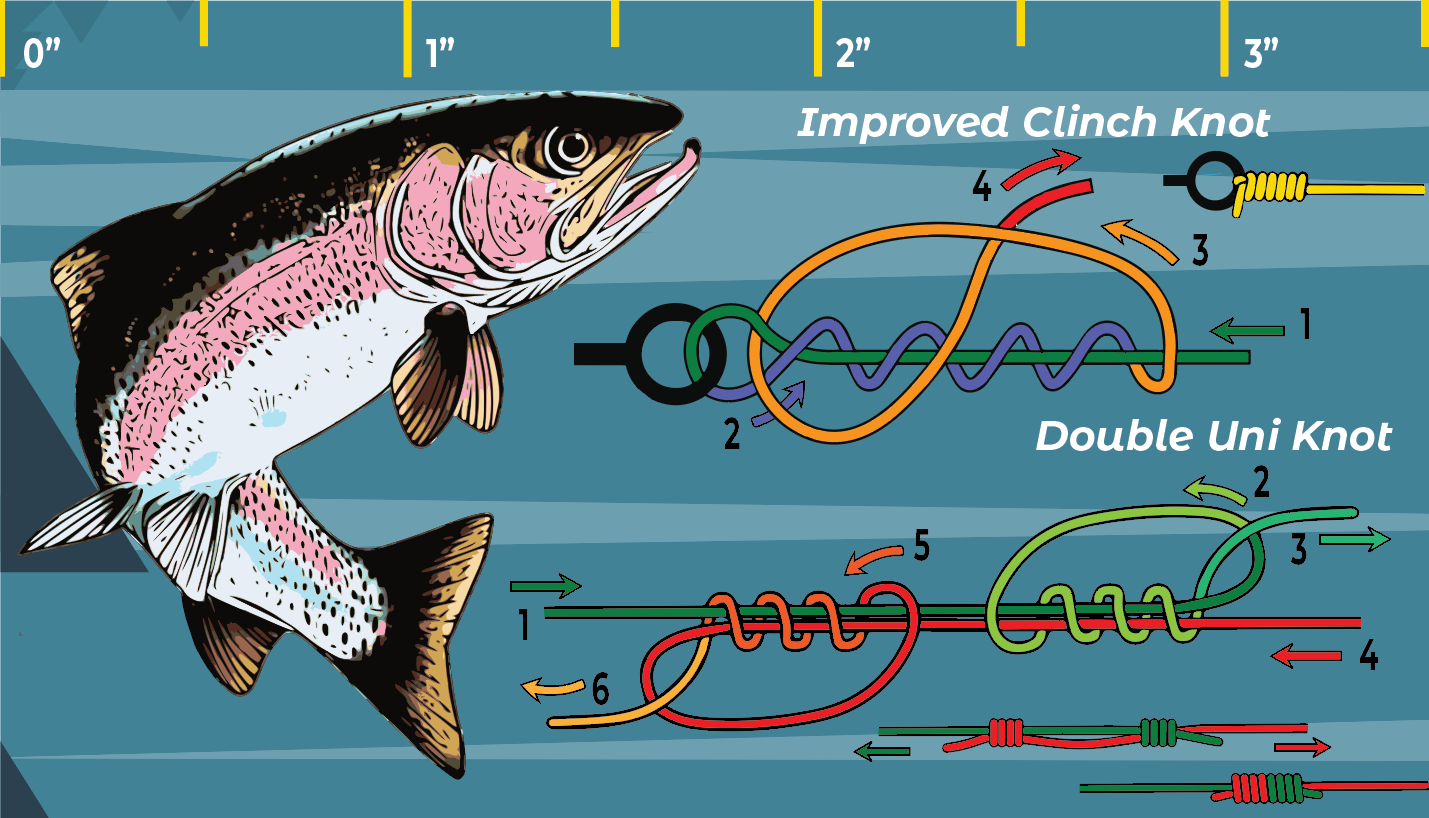
How to Tie the Improved Clinch Knot
If you were only going to learn how to tie one knot for fishing, this would be the one you’d want to know. Also called the “salmon knot,” the improved clinch knot is simple to pick up, easy to remember once you’ve tied it a few times, and it can be used in countless situations – fishing or otherwise.

The improved clinch knot is particularly useful for tying your line to hooks, lures, or artificial flies. It works on virtually any type of line, including braided, mono-filament, and fluorocarbon, and it’s extremely reliable for the equipment that you’re most likely to be fishing with.
Depending on the type of line you’re using and what it’s being attached to, making four or five wraps should be sufficient, but you can always give the knot a healthy tug to be sure it won’t slip.
The improved part of this knot involves the last step where you bring the tag end through a second loop in the knot. This last step adds some additional strength and is left out when tying the regular old clinch knot, which only goes through one loop after making the wraps.
While not as strong, the “non-improved” clinch knot is generally secure enough if you’d prefer to skip the last step above. That said, it might require more wraps to be reliable on your gear (braided line for instance) which wouldn’t spare you much time or effort versus completing the improved clinch knot.
For as versatile as the improved clinch knot may be, its main shortcoming is that it can become more difficult to tie and less reliable when working with heavy line (30lb test for example) or large lures. More wraps become necessary as you size up.
However, if those aren’t your circumstances, then we wouldn’t sweat it. Your line should break long before the improved clinch knot budges – just ask us.
How to Tie the Double Uni Knot
This knot is a real line-saver. The next time you have to cut 10 yards off your spool because there’s a fray forming, snip out the weak section and join those loose ends with the double uni knot.

Along with being useful for eliminating frays without wasting line, the double uni knot can be indispensable for those moments when you’re so stuck in the weeds that you have to cut your losses to get out. After untangling the mess, you can often salvage some line instead of throwing it away (or leaving it behind).
The double uni knot is also great for those times when your reel could use some more line, but you don’t want to waste what’s already spooled up. Just swap in the new line, then tie the leftovers to the fresh end and keep on fishing. And of course, the double uni knot is vital for attaching different types of line together, such as attaching a low visibility fluorocarbon leader to braided line.
If you happen to already to know how to tie the regular uni knot, there isn’t much more to know about the double uni knot. You’re just tying two uni knots instead of one and they slide together to create a line-to-line connection.
As with the improved clinch knot, the number of wraps you make when tying the knot will mostly depend on the type of gear you’re working with. Four or five wraps should generally get the job done.
Line that is heavier, slicker or different in diameter may require more than five wraps, and in some cases it might make more sense to use a double double uni knot. That’s the same exact knot except you start with the end of each line drooping down so they’re doubled up and you’re tying the knots with two strands on each side for additional strength.
There aren’t many drawbacks to joining lines with the double uni knot, but nothing is perfect. The main concern is that a knotted line might not come off your spool as cleanly as fresh line would, but this is tends to be a minor and infrequent issue that can often be avoided with knots that are neatly tied.
While a little trickier to grasp than the improved clinch knot, the double uni knot is equally invaluable for all types of fishing. And like the improved clinch knot, it can be used in many other scenarios. You never know when you’ll need a strong binding between two strands of bank line, paracord or any other type of cordage.
The double uni knot might not be perfect for every line-to-line connection, but it’s reliable and adaptable enough to be a must-know for both anglers and outdoorsmen alike.
Leave a Reply